 Laying a patio doesn’t need to be complicated or stressful. Simply follow these guidelines, in four convenient parts, for a successful end-product.
Part 1: Buying the Supplies
Before buying supplies, measure the length and width of the space where you plan to lay the patio. Pavers come many shapes, sizes, colors, and costs, so make a decision about the type that you want to purchase. The project involves more than just the pavers – you will also need a layer of gravel and a layer of sand.
Part 2: Preparing the Surface
Before preparing the surface, check for underground utilities by calling your local utility company. Typically, you can dial 811 and they will direct you.
Mark off the space with ground stakes and wrap a string or thin rope around the stakes to outline the patio’s perimeter.
Dig 6-to-8-inches, removing all the soil in the marked area. Pour a 4-to-6-inch layer of gravel into the patio trench and compact it using a ground compactor. This is a good time to spray water over the gravel to wet it down so the stones compact better.
Add a layer of fine sand over the gravel and compact it. The sand layer should be about an inch thick and follow the same grade as the gravel. This is the last layer you install before laying paver blocks, so make sure it is smooth.
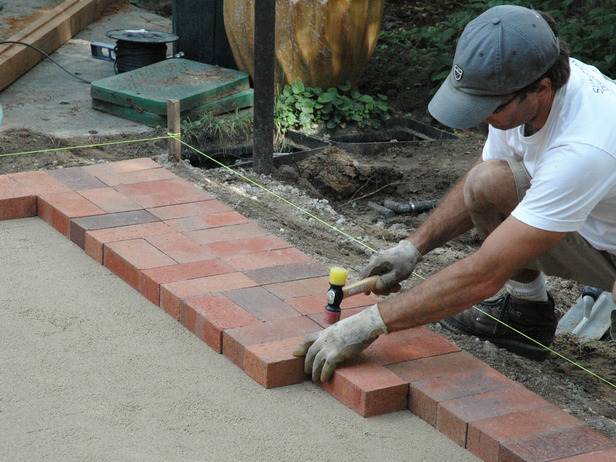
Part 3: Laying the Pavers
Lay the pavers in the pattern you desire. Start at one corner and keep the blocks as close to each other as possible. Check the level as you go. If you need to, cut the pavers around obstacles. Install edging (metal, plastic or wood) around the patio perimeter.
Part 4: Finishing the Surface
Cover the entire paved patio with a thin layer of the same fine sand you used to make the base. Use a broom to sweep the sand back and forth until it fills all the spaces between the pavers. Attach a thick towel or piece of cardboard to the base of the compactor and go over the entire patio. As you go, make sure that the patio is staying relatively level. Finally, take the time to seal your pavers. This process can be done every few years and will make them look better, preventing staining and deterioration.